Dark Room Experiments
|
The darkroom The main use of a darkroom is to print your photographs in the traditional way. Its called a darkroom because it is almost completely dark – apart from a red light called a “safe light”. This is really important because it allows you to handle the light-sensitive materials necessary to make traditional darkroom prints. The set-up includes: - Enlarger - Safe light - Darkroom trays - safe light - Developer - Stop bath - fix - Print tongs - photogenic paper |

|
In the darkroom, you have the enlarger which is a special kind of projector used to create your photographic prints. By shining light through the negative, it transfers your image from the small negative and enlarges it onto your paper. Next, you have a safe light which converts your dark space into a red lit darkroom, the reason this red light can be on without ruining the photogenic paper is that nearly all darkroom papers are partially blind to red light (orthochromatic). There are also three dark room trays which are incredibly important for the creation of your photogram.
The first one in which you put your photogram into is the developer tray, make sure all parts are covered at the same time to avoid shade inconsistencies. Leave it in there until it is fully developed (which usually takes about 2-4 minutes) then put it into the stop for 30 seconds. Then put it into the fix for about 2-3 minutes and after this, rinse in the water bath for about 5 minutes before drying the image.
To make this process easier you also use print tongs in order to carefully transport the photogenic paper to and from each tray.
- what is a photogram?

You are missing a description of test strips, all the techniques. You should have your own example for each one.
- Test Strip
In order to make one you follow these steps:
- Firstly, set up all your items that you have selected in their usual places beneath the enlarger on top of the photographic paper as if you were creating a normal photogram.
- Once you have done this set your aperture to your desired settings and your timer to 1 second.
- After you have selected your settings take a piece of A4 black card paper, this will then be used to be held over the photographic paper for each second the light is exposed to the paper in order to create different 'strips' that are all different shades.
- Now you should've ended up with a test strip that consists of multiple different shades on your image, you will now choose the strip where the light works the best and use that timing settings for the rest of your photograms.

The processes
|

|
|

|
|

|
|

|
|
|

|
pinhole camera
|
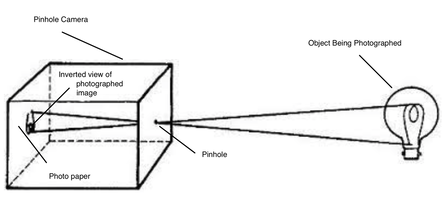
In this task, I was required to successfully make a pinhole camera, and use it to create a number of interesting images. These included: a shot from the corner of a building, a portrait, a double exposure image, and one from a window looking outwards. what is a Pinhole camera? A pinhole camera is the simplest form of a camera, and is based off of a camera obscura. A camera obscura is a room or container that has been blacked out, except for a small hole that lets light through. This principle is applied to the pinhole camera, where I used a large can with a pinhole in it to create my camera. |

|
|
In order to make a pinhole camera you will need the following items:
- Elongated Can - Electrical tape - Black gaffer tape - A Pin - Black cardboard paper |
|
First of all, you need to measure out the black card so that it wraps around the diameter of your can. Then draw lines 1cm apart, along the black card - and 3.5cm down from the long side of the card.
You will also need to draw around the end of your can to make a circle on the black card that you can then cut out to make the lid. Then, use the can opener to remove the lid of the can.
Make sure the inside of the can is empty and dry or else that might disturb the process of the photogram.
Wrap the cardboard with strips cut into it around the top of the can where the lid used to be.
Fold in the strips and stick the circle over the top to close the gap and keep the strips in place.
You will then have to go over the lid with the gaffer tape, and so the lid is secure therefore will not allow any light to pass through. Finally, the last step required is to make a hole in the can by using the pin to pierce through roughly half way down on the front of the can, and to add a strip of electrical tape over the hole.

Another set of task intentions required for us to do this task was using our pinhole camera we were required to take photographs of the following
Below I have presented my examples of each of these categories:
- Corner of building with a person in it
- from the view of a window
- A portrait
- A double exposure
Below I have presented my examples of each of these categories:
corner
|
NEGATIVE

|
POSITIVE

|
WWW - I'm really satisfied with the outcome of the negative image as you can clearly see every part in the architectural structure, considering it was taken on a railing it has come out clear and with different tones.
EBI - The image can be seen as a bit blurry As I was balancing on a railing, in order to avoid this effect again I will expose the photo for less time than I did as it is also a bit over exposed which also greatly effects the quality of the image. As well as this I was also accidentally leaving marks on my images from the tongs during the developing process. However once I had fully developed them I was more careful while handling my next lot of images to avoid damaging them.
portrait
|
NEGATIVE

|
POSITIVE

|
WWW - I think the exposure is very balanced in this photogram, as in it is not too bright or dark. In order to achieve this balance I adjusted where I was taking my pictures, and the amount of time I exposed them for. For example, if I was in a brighter area outside in the sun, I had to expose the pinhole for less time. I found that 2 or 3 seconds worked well for this. It also comes across as a very clear image
EBI -
window view
|
NEGATIVE

|
POSITIVE

|
WWW - Even though this image struggles with the composition element of things I believe that it was successful when capturing the variety of different buildings I focused on, as well as this you can see the clear outlines of the individual structures.
EBI - If I heavily improved my composition then the outcome of my image would of been better to have the corner cantered in the middle of the frame along with the models closer to the photo to make it clear what I am photographing.
Double exposure
|
NEGATIVE

|
POSITIVE

|
WWW - I favour the composition of this image as the model is secured in the middle of the frame thus more emphasis on her than the background.
EBI - In this image I have yet again struggled with the blurriness of the photo, to ensure I don't repeat my mistake in the future I will be more cautious when removing the tape from the pinhole camera and holding it still to ensure better quality. As well as this you fail to see when I have used the double exposure technique as there is little movement occurring. To improve this I should've had a longerexposure time to allow the light longer time to expose.
SLr camera

This type of camera uses rolls of film to capture images meaning it has to be developed and their is a limit to the amount of images that can be taken, unlike digital in which you can take photographs and then check them as soon as they have been taken. The back of the camera is opened, and the roll of film is slotted into it. You will be required to set the aperture and shutter speed in order to determine how much and for how long you want your film to be exposed for.
Method
when you have organised your subject and wish to take the photo and look through the viewfinder, light will pass through the lens and bounce off a diagonally placed mirror, into your eye. This is due to an internalised mirror prism system that exists within the SLR camera. Then, when you press the shutter release button, the shutter opens, allowing the film at the back of the camera to be exposed to the light. Once light hits the film, a chemical reaction occurs and therefore starts to form the image. The film must then be processed in complete darkness for the image to be developed.
- SLR stands for single lens reflex which explains how this type of camera is used.
This type of camera uses rolls of film to capture images meaning it has to be developed and their is a limit to the amount of images that can be taken, unlike digital in which you can take photographs and then check them as soon as they have been taken. The back of the camera is opened, and the roll of film is slotted into it. You will be required to set the aperture and shutter speed in order to determine how much and for how long you want your film to be exposed for.
Method
when you have organised your subject and wish to take the photo and look through the viewfinder, light will pass through the lens and bounce off a diagonally placed mirror, into your eye. This is due to an internalised mirror prism system that exists within the SLR camera. Then, when you press the shutter release button, the shutter opens, allowing the film at the back of the camera to be exposed to the light. Once light hits the film, a chemical reaction occurs and therefore starts to form the image. The film must then be processed in complete darkness for the image to be developed.

|
Exposure Triangle The exposure triangle consists of three variables that adjust how a camera captures light. These are the aperture, ISO and shutter speed. Together, these three elements allow a shot to be properly exposed, and in order for the picture to look presentable they are all dependant on another. |
ISO
This is effectively the camera's sensitivity to light. The higher the ISO, the higher the sensitivity and exposure. It is typically measured in numbers, a lower number represents a darker image, while brighter images means a brighter image. Examples of ISO include; 100,200, 400.
Shutter Speed
The shutter speed is the amount of time that the camera lens closes and opens to light and is measured in fractions of a second. A slow shutter speed allows more light into the camera and is used for low light and night settings, fast shutter speeds help to freeze motion. Examples include 1/15, 1/30, 1/60 and 1/125.
Aperture
This is the hole in the lens of the camera that can be adjusted to let in more or less light, depending on how exposed you want your images to be. Aperture also controls the depth of field in a photograph. For example if the aperture is small then the depth of field is large and if the aperture is large then he depth of field will be small. In photography aperture is represented as F also known as the f numbers since this is the ration of diameter from the lens.
My first film
Task Intentions
In this task, my intentions were to successfully create my first film, and experiment with exposure and shutter speed whilst doing so. The first part of the task was to take close up portraits of my subject, using a fixed shutter speed. This was 1/125 of a second, while I had my aperture on F8. I used a plain background to eliminate unneeded distractions from the subject in my images, and avoided direct sunlight as this creates shadows and overexposure.
For the next part of the task, I had to photograph my partner whilst in movement in order to create a blurred effect. In order to achieve this i needed to have a low shutter speed for the camera to allow light in slowly thus creating the intended blur. The aperture was fixed at f8, while I made the shutter speed larger. Though throughout the second task I experimented with the shutter speed starting at 2 seconds, gradually increasing the speed.

|
Developing the film
After you have completed your roll of film in the camera, You will need to complete the first step of developing your photos. This consists of reeling your film back into the canister before opening up the camera and removing it. The next steps require you to be in a completely pitch black room. Once you're in the loading room, you need to: First, open up the film cassette with your film inside and unreel it. To load the film onto the reel, begin by finding the slit on the edge of the reel and slide the film into it. Once you have checked it is secure and no film has escaped further on in the roll, twist the side of the reel back and forth. This automatically winds the rest of the film easily as you are doing it. After that, locate your film tank’s detached core, and slide it through the hole in the centre of the film reel making sure it is on and attach the top of the detached core on to it. |
Next, place the reel flat in the bottom of the tank so that the core is sticking up in the centre. Cover your film tank with the lid and make sure it’s secured tight, you will know when it is secured as you will hear a sharp click.
The next step is developing your photos. This step is fairly similar to how you would normally develop your photos as you follow the same method of develop, stop and fix. First, You need to remove the lid and then mix 60 ml of developer with 600ml of water in a cylinder and pour it into the tank, make sure you have measured correctly when doing this. Put the lid back on and gently agitate the chemicals constantly for the first 30 seconds by rotating the tank gently. After the 30 seconds is up you will only have to agitate for a few seconds every 30 seconds for 6 minutes.
Now you must drain the developer mixture from the film tank. Replace it with stop bath until tank is full. Agitate for 30 seconds to help the stop bath spread evenly throughout the tank.
The final chemical you will need to include in the developing process is fixer, which will stabilise the film so that it can be exposed to light without damage. Pour out your stop bath and replace it with the fixer. repeat the same agitation technique you have carried out before with the developer mixture, leaving the fixer in the tank for about 4–5 minutes.
After the fixer process, your film is safe to be exposed to light and therefore safe to remove from the tank. Thoroughly rinse the film with cold water for a five minutes.
Unravel the film and use a clothespin to hang the film to dry, and attach another to the bottom of the film so that it hangs taut. Let it dry overnight before removing.
You now should end up with a long strip of film that is transparent, to further protect these and to be able to easily transport them put the film into a plastic wallet.
Test Strip
Before exposing the entirety of my film that I have just finished developing to light and resulting in the small individual photos becoming visible, I need to first create a test strip as this will be extremely beneficial to the efficiency and ease of the method. It will give me multiple different options, in my case 4, which I will then select by choosing the time for which I exposed that strip for. This will also save me from using and wasting lots of photographic paper.
My test strip is shown below and I ended up selecting the 3 second timing settings for the exposure of my film.
My test strip is shown below and I ended up selecting the 3 second timing settings for the exposure of my film.

Contact Sheets
Below is my first attempt at creating my contact sheet with a time of 3 seconds beneath the enlarger
Below is my first attempt at creating my contact sheet with a time of 3 seconds beneath the enlarger
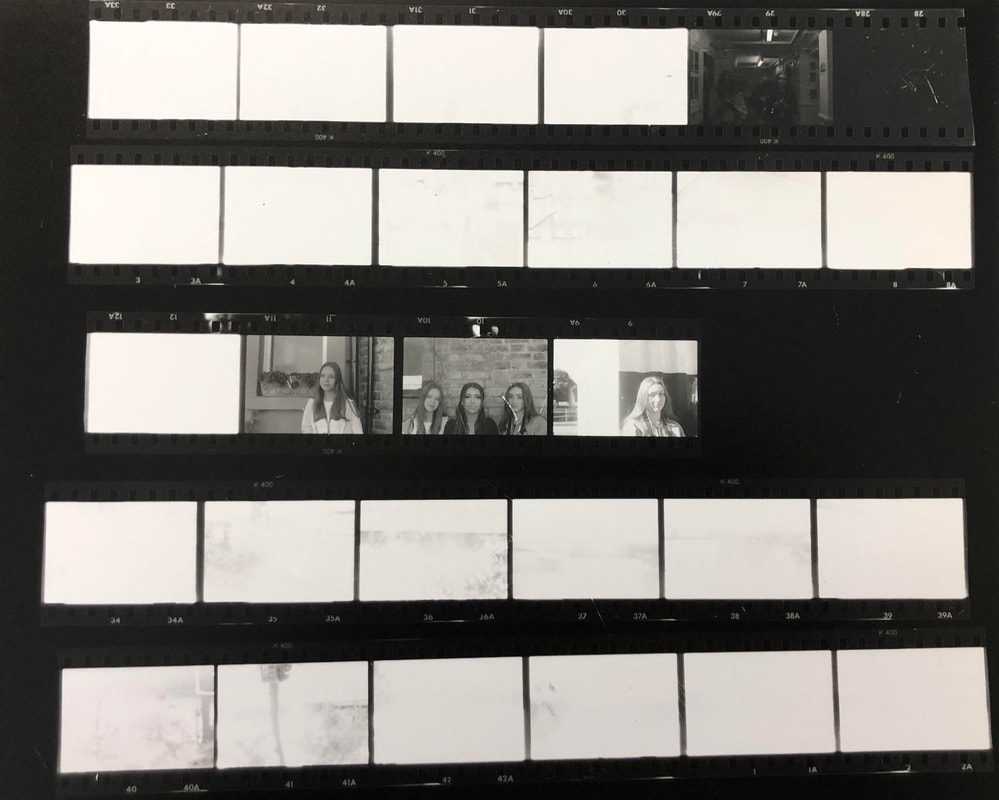
I havent been able to upload images of my contact sheet and enlarged photos because i wasn't there, i have been ill for the past week and missed some lessons this week where everyone finished developing their contact sheets, and i havent done the enlarging process which is why it is not documented
Foundation Assessment
Strong understanding and clear explanations of all processes and techniques. The set tasks are completed to a high standard and there is a clear attention to detail with all tasks undertaken. You show excellent understanding of how to use a pinhole camera but your film development needs work. The contact sheet only shows a few images. It would be good to undertake this task again.
